
前一篇〈OpenAPI 打通前後端任督二脈〉介紹了 OpenAPI,以及與 OpenAPI 深度整合的 Python web 框架 FastAPI,但在前端讀取 OpenAPI 並轉為程式碼部份,身為 Swagger 家族~祖傳~正宗~本家~嫡系~的 Swagger Client 卻不怎麼香,沒帶來多少便利性,也無法讓我們少奮鬥三十年。
直到看到一套 OpenAPI Typescript Codegen,用了覺得真的挺不錯的,特地撰文以資表揚。
顧名思義,OpenAPI Typescript Codegen 會讀入 OpenAPI 定義的 API 規格,並產出一系列 TypeScript 模組,讓我們在前端專案可以方便調用。
2024 年起 OpenAPI Typescript Codegen 原開發者沒時間照顧它,由新團隊接手另起爐灶推出新專案 OpenAPI Typescript,下文也以新的 OpenAPI Typescript 為基礎改寫。
安裝
它的安裝方式如同一般典型 JS 套件:
$ npm install @hey-api/openapi-ts --save-dev產生 OpenAPI 客戶端模組
安裝後專案內會多一個 openapi-ts 命令,我們用它來產出 API 的 TS 模組:
$ npx openapi-ts --input http://localhost:5000/openapi.json --output ./src/openapi-client上面的參數應該是可以望文生義,我們可以把它寫為 NPM 指令,在 package.json scripts 區塊加入下例:
"scripts": {
  "openapi-ts": "openapi-ts --input http://localhost:5000/openapi.json --output ./src/openapi-client"
},
往後只要執行 npx openapi-ts 就可以。
或者可以把參數寫入 openapi-ts.config.ts 檔案內,如下例:
import { defineConfig } from '@hey-api/openapi-ts'

export default defineConfig( {
    input: 'http://localhost:5000/openapi.json',
    output: 'src/openapi-client',
} )
如此 package.json 中的指令可以簡化為 "openapi-ts": "openapi-ts。
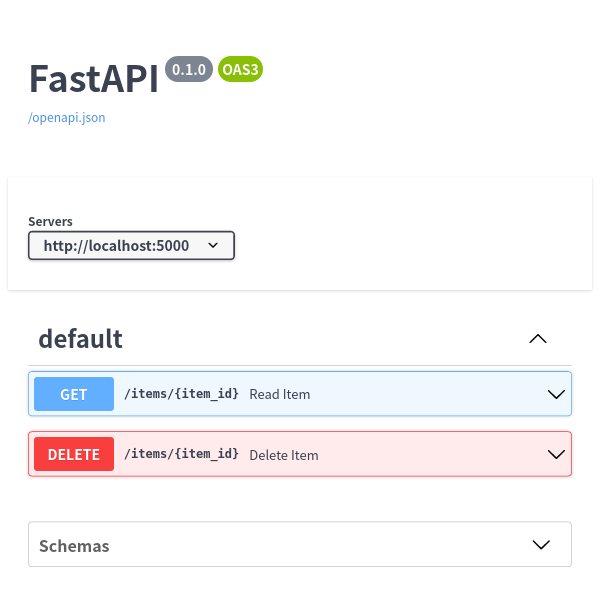
那個來源的 openapi.json 檔案可能如下:
{
  "openapi": "3.0.2",
  "info": {
    "title": "FastAPI",
    "version": "0.1.0"
  },
  "servers": [
    {
      "url": "http://localhost:5000"
    }
  ],
  "paths": {
    "/items/{item_id}": {
      "get": {
        "summary": "Read Item",
        "description": "Read item by id.",
        "operationId": "read_item",
        "parameters": [
          {
            "required": true,
            "schema": {
              "title": "Item Id",
              "type": "integer"
            },
            "name": "item_id",
            "in": "path"
          }
        ],
        "responses": {
          "200": {
            "description": "Successful Response",
            "content": {
              "application/json": {
                "schema": {
                  "$ref": "#/components/schemas/Item"
                }
              }
            }
          },
          "422": {
            "description": "Validation Error",
            "content": {
              "application/json": {
                "schema": {
                  "$ref": "#/components/schemas/HTTPValidationError"
                }
              }
            }
          }
        }
      },
      "delete": {
        "summary": "Delete Item",
        "description": "Delete item by id.",
        "operationId": "delete_item",
        "parameters": [
          {
            "required": true,
            "schema": {
              "title": "Item Id",
              "type": "integer"
            },
            "name": "item_id",
            "in": "path"
          }
        ],
        "responses": {
          "200": {
            "description": "Successful Response",
            "content": {
              "application/json": {
                "schema": {}
              }
            }
          },
          "422": {
            "description": "Validation Error",
            "content": {
              "application/json": {
                "schema": {
                  "$ref": "#/components/schemas/HTTPValidationError"
                }
              }
            }
          }
        }
      }
    }
  },
  "components": {
    "schemas": {
      "HTTPValidationError": {
        "title": "HTTPValidationError",
        "type": "object",
        "properties": {
          "detail": {
            "title": "Detail",
            "type": "array",
            "items": {
              "$ref": "#/components/schemas/ValidationError"
            }
          }
        }
      },
      "Item": {
        "title": "Item",
        "required": [
          "id",
          "name",
          "quantity"
        ],
        "type": "object",
        "properties": {
          "id": {
            "title": "Id",
            "type": "integer"
          },
          "name": {
            "title": "Name",
            "type": "string"
          },
          "quantity": {
            "title": "Quantity",
            "type": "integer"
          }
        }
      },
      "ValidationError": {
        "title": "ValidationError",
        "required": [
          "loc",
          "msg",
          "type"
        ],
        "type": "object",
        "properties": {
          "loc": {
            "title": "Location",
            "type": "array",
            "items": {
              "type": "string"
            }
          },
          "msg": {
            "title": "Message",
            "type": "string"
          },
          "type": {
            "title": "Error Type",
            "type": "string"
          }
        }
      }
    }
  }
}
從 openapi.json 產生出的程式如下:
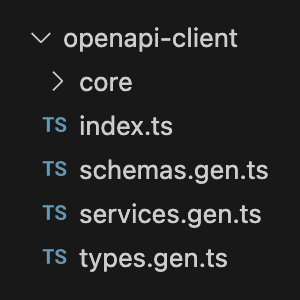
其中:
- core/ 是底層共用的模組,本質上它是 Fetch API 的再封裝。
- services.gen.ts 是串接 API 的主要函式所在。
- schemas.gen.ts 是 openapi.json 內抽出來的 JSON Schema。
- types.gen.ts 顧名思義就是那些從 JSON schema 轉換來的 TS type。
這些 service、type、schema 都暴露在 index.ts 內,所以可以直接 import 整個模組調用。
對照上面 Swagger UI 的資訊,Swagger UI 中的「Read Item」會變成 readItem() 函式,而 Item schema 會分別對應到 Item type 與 $Item schema。
讓我們看以下的例子。
使用 OpenAPI 客戶端模組
使用上很簡單,例如要向「Read Item」要資料:
import { readItem } from './openapi-client'

const itemId = 102573

async function refreshItem(() => {
  const response = await readItem(itemId)
  consle.debug(response) // {id: 102573, name: 'Nameless', quantity: 0, ... }
})
受惠於產生器和 TypeScript 完整的型別定義特性,IDE 的提示和補完機能得以滿載發揮,你幾乎不用去看 Swagger UI 就能給出該支 API 所需要的資料。
回應也是一樣,response 帶有完整型別定義,我們無須反覆查閱 Swagger UI。
不論是 GET、DELETE、POST、PUT 等等,都是如此這般調用,再也不用手刻 xxx 攔截器,再也不用自行二次封裝,靠 OpenAPI Typescript 產生的懶人包就能讓我們優雅調用 API。
身份認證
要附加認證資訊當然也可以,OpenAPI 本身支援好幾種 security scheme,而 OpenAPI Typescript 則支援 HTTP Basic 認證 和 OAuth 2 的 access token 認證。
以 access token 為例,可以這麼使用:
import { OpenAPI, readItem } from './openapi-client'

// 全域附上 access token
OpenAPI.TOKEN = 'eyJhXXX.eyJzXXX.SflKXXX'

const itemId = 102082

async function refreshItem(() => {
  const response = await readItem(itemId)
  consle.debug(response)
})
只要這麼一行,下面的所有交互都會自動附上該 token,蒸的很蚌!
至於那 access token 該怎麼來就取決於 API 服務端的設計,如果是 OAuth 2 password flow,僅須一次交互,那也可以用產生的客戶端模組取得,如果是需要多次交互的,例如 OAuth 2 implicit flow、authorization code flow、PKCE flow 等,那就要自己動手取得囉,畢竟那些複雜的 flow 還有可能需要「前端的後端」參與,無法單靠一個前端套件搞定。
設定後端 base URL
上面引入的 OpenAPI 是一個 OpenAPIConfig 型態的物件,除了可以用來配置 token 外,還有個很重要的特性是配置後端位址,例如在正式環境後端位址寫於正式環境的 .env 中,再於程式中讀入:
import { OpenAPI, readItem } from './openapi-client'

// 附上 token 與指定後端 base URL
OpenAPI.TOKEN = 'eyJhXXX.eyJzXXX.SflKXXX'
OpenAPI.BASE = import.meta.env.VITE_BACKEND_BASE_URL

const itemId = 102082

async function refreshItem(() => {
  const response = await readItem(itemId)
  consle.debug(response)
})
只要設定一次,後面所有的請求都會改向新定的 base URL,並且附上 access token。
除上例外,也可以配置發出請求時的 HTTP 標頭等參數,取決於需求運用囉!
結語
OpenAPI 已經是實質的產業標準,許多 open data 供應方都有提供 OpenAPI 文件,配合 OpenAPI Typescript 就可以加快客端的開發腳步,而如果是自有產品,那前後端之間更是需要像 OpenAPI 這樣的橋樑建立起溝通的管道,除非你很喜歡用 Word 寫文件。
相較於在 Word 寫,直接從程式碼轉出成 OpenAPI 顯得有效率多了,後端從程式碼產生 OpenAPI 文件,前端再從 OpenAPI 文件產生程式,就像一條運作順暢的流水線,自在極意、通體舒暢。
除了 Python 的 FastAPI,其他的框架大都有內建或外掛的 OpenAPI 整合,例如 APIFlask、Strapi、Directus 等等,可以多加利用。
Share


作者:Leon
還在適應工作,工作也還在適應我。

